InfluxDB: Use Docker Compose for InfluxDB 3 Core
This is how to create an InfluxDB 3 container in Docker, using docker compose.

InfluxDB version 3 is the latest and greatest InfluxDB version. Key features are:
- Diskless architecture with object storage support (or local disk with no dependencies)
- Fast query response times
- Embedded Python VM for plugins and triggers
- Parquet file persistence
- Compatibility with InfluxDB 1.x and 2.x write APIs
If you want to know more of it, see the InfluxDB 3 Core documentation.
To test it from within Docker, you can use this Docker Compose file:
services:
  db:
    image: influxdb:3-core
    ports:
      - 8181:8181
    environment:
      INFLUXDB3_NODE_IDENTIFIER_PREFIX: 00
      INFLUXDB3_OBJECT_STORE: memory
Port 8181 will be exposed, and you can connect to it by curl or any other HTTP method, or by using any client that writes data to InfluxDB.
Unfortunately, InfluxDB 3 Core has no web console, as InfluxDB 2 had. But there is a service we can use for that: InfluxDB 3 Explorer:
services:
  explorer:
    image: quay.io/influxdb/influxdb3-explorer:latest
    hostname: influxdb3-explorer
    ports:
      - 8888:8888
    networks:
      - proxiable
      - influxdb3
After pulling the image and starting the container, the web interface will be available using http://<hostname>:8888.
Surely, you can also combine the two services:
networks:
  influxdb3:
    name: influxdb3

services:
  db:
    image: influxdb:3-core
    hostname: influxdb3
    environment:
      INFLUXDB3_NODE_IDENTIFIER_PREFIX: 00
      INFLUXDB3_OBJECT_STORE: memory
    networks:
      - influxdb3
  explorer:
    image: quay.io/influxdb/influxdb3-explorer:latest
    hostname: influxdb3-explorer
    ports:
      - 8888:8888
    networks:
      - influxdb3
After starting these containers by using docker compose pull and docker compose up -d, we'll have to generate an admin token.
To do that, we have to connect to the container and execute this command:
# docker exec -ti <container name> bash

# influxdb3 create token --admin

Token: apiv3_gPXiT-JQENVdveolXNBCOJmU4wUBjs1FrIVr0BwQxHxQlSOC4FowDKUAdkia7k3mQMVkGiI68GMhf2wuv07Yeg

HTTP requests require the following header: "Authorization: Bearer apiv3_gPXiT-JQENVdveolXNBCOJmU4wUBjs1FrIVr0BwQxHxQlSOC4FowDKUAdkia7k3mQMVkGiI68GMhf2wuv07Yeg"
This will grant you access to HTTP/GRPC API.
Then, set the environment to allow any changes to the InfluxDB system:
# export INFLUXDB3_AUTH_TOKEN=apiv3_gPXiT-JQENVdveolXNBCOJmU4wUBjs1FrIVr0BwQxHxQlSOC4FowDKUAdkia7k3mQMVkGiI68GMhf2wuv07YegAfter that, we're able to create a database:
# influxdb3 create database metrics
Database "metrics" created successfully
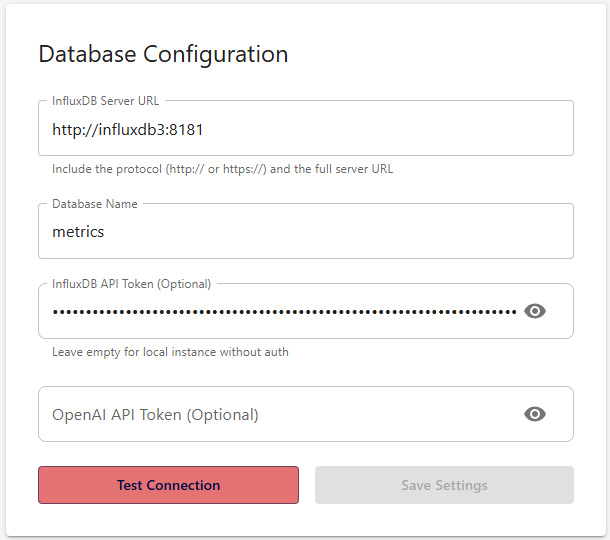
Then, we can connect to the InfluxDB 3 Explorer web console (see above) and configure access to the database:

We can insert the server URL, the name of the database we just created, and the API token. Click Test Connection to see if everything worked. It should look like this:

Now, you can start importing data, and you should see it from within the InfluxDB 3 Explorer.
Unfortunately, not all features we know from InfluxDB2 web interface, exist in this Explorer - it's pssible to access and query data, but there's no bucket or API key, nor user management...